
An Application Example That Consumes Messages from a Remote Java EE Server
This section and the following section explain how to write, compile, package, deploy, and run a pair of Java EE modules that run on two Java EE servers and that use the JMS API to interchange messages with each other. It is a common practice to deploy different components of an enterprise application on different systems within a company, and these examples illustrate on a small scale how to do this for an application that uses the JMS API.
However, the two examples work in slightly different ways. In this first example, the deployment information for a message-driven bean specifies the remote server from which it will consume messages. In the next example, the same bean is deployed on two different servers, so it is the client module that specifies the servers (one local, one remote) to which it is sending messages.
This first example divides the example in Chapter 23 into two modules (not applications): one containing the application client, and the other containing the message-driven bean.
This section covers the following topics:
You will find the source files for this section in
<INSTALL>/javaeetutorial5/examples/jms/consumeremote/. Path names in this section are relative to this directory.Overview of the Modules
Except for the fact that it is packaged as two separate modules, this example is very similar to the one in Chapter 23:
The basic steps of the modules are as follows.
- The administrator starts two Java EE servers, one on each system.
- On the remote server, the administrator places the client JAR file.
- On the local server, the administrator deploys the message-driven bean module, which uses a connection factory that specifies the remote server where the client is deployed.
- The client module sends three messages to a queue.
- The message-driven bean consumes the messages.
Figure 33-3 illustrates the structure of this application. You can see that it is almost identical to Figure 23-1 except that there are two Java EE servers. The queue used is the one on the remote server; the queue must also exist on the local server for resource injection to succeed.
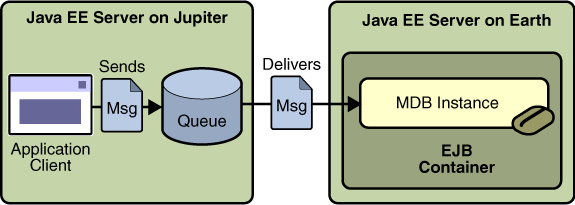
Figure 33-3 A Java EE Application That Consumes Messages from a Remote Server
Writing the Components
Writing the components of the modules involves
The application client,
jupiterclient/src/java/SimpleClient.java, is almost identical to the one in The Application Client (page 766).Similarly, the message-driven bean,
earthmdb/src/java/MessageBean.java, is almost identical to the one in The Message-Driven Bean Class (page 767).The only major difference is that the client and the bean are packaged in two separate modules.
Creating and Packaging the Modules
For this example, the message-driven bean uses the connection factory named
jms/JupiterConnectionFactory, which you created in Creating Administered Objects for Multiple Systems (page 1063). Use the Admin Console to verify that the connection factory still exists and that itsAddressListproperty is set to the name of the remote system. Because this bean must use a specific connection factory, the connection factory is specified in themdb-connection-factoryelement of thesun-ejb-jar.xmlfile.If you deleted the connection factory, you can recreate it as follows:
The application client can use any connection factory that exists on the remote server; it uses
jms/ConnectionFactory. Both components use the queue namedjms/Queue, which you created in Creating JMS Administered Objects (page 1052).We'll assume, as we did in Running JMS Client Programs on Multiple Systems (page 1062), that the two servers are named
earthandjupiter.The Application Server must be running on both systems.
Which system you use to package and deploy the modules and which system you use to run the client depend on your network configuration--which file system you can access remotely. These instructions assume that you can access the file system of
jupiterfromearthbut cannot access the file system ofearthfromjupiter. (You can use the same systems forjupiterandearththat you used in Running JMS Client Programs on Multiple Systems, page 1062.)You can package both modules on
earthand deploy the message-driven bean there. The only action you perform onjupiteris running the client module.To package the modules, perform these steps:
- Go to the following directory:
<INSTALL>/javaeetutorial5/examples/jms/consumeremote/earthmdb- Type the following command:
antThis command creates a JAR file that contains the bean class file and the
sun-ejb-jar.xmldeployment descriptor file.- Go to the
jupiterclientdirectory:
cd ../jupiterclient- Type the following command:
antThis target creates a JAR file that contains the client class file and a manifest file.
Deploying the EJB Module and Copying the Client
To deploy the
earthmdbmodule, perform these steps:To copy the
jupiterclientmodule to the remote system, perform these steps:Running the Application Client
To run the client, perform the following steps:
On
jupiter, the output of theappclientcommand looks like this:Sending message: This is message 1 Sending message: This is message 2 Sending message: This is message 3On
earth, the output in the server log looks something like this (wrapped in logging information):MESSAGE BEAN: Message received: This is message 1 MESSAGE BEAN: Message received: This is message 2 MESSAGE BEAN: Message received: This is message 3Undeploy the message-driven bean after you finish running the client. To undeploy the
earthmdbmodule, perform these steps:You can also delete the
jupiterclient.jarfile from the remote filesystem.To remove the generated files, use the following command in both the
earthmdbandjupiterclientdirectories:
All of the material in The Java™ EE 5 Tutorial is copyright-protected and may not be published in other works without express written permission from Sun Microsystems.